- Home
- Butterfly Art
- Easy Butterfly
Easy Butterfly Painting: Step-by-Step Monarch Butterfly Tutorial
Get creative with this easy butterfly painting tutorial.
Nothing captures the essence of nature's beauty quite like the wondrous Monarch Butterfly, a symbol of transformation, joy and freedom.
Go on a journey of creating your own masterpiece with this guide to drawing and painting a butterfly.
This step-by-step tutorial is for budding artists or anyone painting a watercolor butterfly.
 Paint the majestic Monarch.
Butterflies are awesome and it's such a joy to paint them. Here's what we use:
- 5x8 inch watercolor paper
- #4 and #8 round brushes
- Cadmium Orange, a redder orange, Burnt Sienna and Ultramarine Blue (Cadmium Red Light can be mixed Cad Orange to get a redder orange.)
- Water-resistant black ink pen
drawing our easy butterfly painting
We draw the butterfly before jumping into paint. This greatly streamlines the painting process.
Lightly do a pencil drawing. The images below are ink, so they are much darker than pencil. The guidelines are blue on this page, but they are actually regular pencil lines.
 Use a reference photo.
It's always good to have a reference for a realistic painting.
This is a male Monarch with scent pouches on his hind wings. See photos of other types of butterflies.
 Draw the butterfly's body.
Draw a center guideline. Guidelines are blue.
Draw the body on the center line.
Add two more guidelines angled down to about one quarter of the paper's width.
 Draw the fore-wings.
Add 2 more guidelines from the shoulders out to about 2/5 of the paper's height.
Sketch the two top wings.
 Draw the edge of the hind-wings.
Sketch the bottom edge of the two back wings.
Erase the guidelines.
 Draw the fore-wing veins.
Draw the veins on the fore-wings.
Start with the large upper vein indicated in red.
Then add the three sections below it. They are parallel with the inside edge of the wing.
 Put the veins on the back wings.
Now add the veins to the back wings.
Start with the vein closest to the body. It is mostly parallel to the body. Add the 2 or 3 attached veins.
Draw the top of the black trim on the wings.
It's important to start with a drawing
Your finished butterfly drawing will look somewhat like this. Draw it or get it on the paper any way you desire.
 Finish drawing the butterfly.
After the drawing is finished, go over the drawing lines with water-resistant black ink.
Going over the lines with black ink, is what makes this an easy butterfly painting.
We won't have to paint all the black veins later. That makes it easy-peasy.
Create your Easy Butterfly Masterpiece
Five easy steps make this an easy butterfly painting.
step #1
We use a #8 brush for the entire painting. The one exception is the white spots and the small designs on the tips of the fore-wings. They are painted with a smaller #4 brush.
 #1 Paint the orange on the front wings.
We will start painting the fore-wings. They are a redder orange than the hind-wings.
Cadmium Orange is a yellowish orange. We want a reddish orange.
Select a reddish-orange or mix your own by mixing a bit of Cadmium Red Light with Cadmium Orange.
Paint the four orange sections of each fore-wing. Paint right over the black veins.
step #2
Moving to the hind-wings, we paint them with Cadmium Orange. It's a nice bright orange.
 #2 Paint the orange on the back wings.
Don't worry about trying to get the paint on smooth and all the same. Variations make the painting more interesting. They show it's a painting, instead of a photograph.
Winsor Newton cadmium colors do not actually contain any cadmium.
step #3
Next, we start painting the black parts of the butterfly.
 #3 Paint the body and start trimming the wings.
Black is easy to mix with Burnt Sienna and Ultramarine Blue. A mixed black will have some variations that add interest. You certainly may use tube black.
Paint the butterfly's head and body. Paint the body darker on the sides. Use less paint on the top of the body to give it a rounded form.
If the body gets painted too dark, dab some of the paint off the top of the body with a clean, damp brush.
Paint the inside black edge of the fore-wings.
Recommended colors for your watercolor palette
step #4
Continue painting all the black trim on the wings.
It's starting to look like a butterfly. That's the joy of painting.
 #4 Complete the black edges of the wings.
step #5
Paint black around the designs on the ends of the fore-wings.
 #5 Paint the white spots and dashes.
Paint the white spots and dashes in the black wing edges. They may be handled in one of two ways:
- Paint around the spot, leaving the white paper. The spots look nice and white.
- Paint white spots or dashes on top of the black paint using Titanium White watercolor or white gouache. The white is not as clean looking
- It's your choice, either way is fine.
There are more ways to save the white paper besides painting around it.
Enjoy the art of painting!
Tap your inner artist and enjoy expressing yourself with this easy butterfly painting. Paint the Monarch or use the same steps to paint other types of butterflies.
ArtbyCarolMay.com offers a treasure trove of painting guides, ideas and tips to feed your desire to create.
We've only just scratched the surface. Where ever you are in your artwork, the painting tutorials and art lessons here can unlock new realms for your artistic journey.
there are more butterflies to paint
Butterfly Paintings: Appreciate the Exquisite Beauty of Nature
Butterfly Paintings: a captivating art collection showcasing the extraordinary beauty of butterflies. Marvel at each detail and enjoy the marvelous butterflies.
Painting Butterflies with Watercolor
Enjoy the confidence and fun of painting butterflies. Start painting your own watercolor butterflies and flowers with an easy step-by-step tutorial by Carol May
Paint a Giraffe - Let's paint 3
Choose a style to paint a giraffe your way. Express yourself with traditional watercolor, an easy painting or a colorful painting, step-by-step instructions.
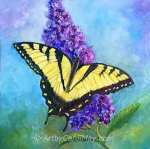
Paint a Butterfly with watercolors
Take the stress out of learning how-to paint a butterfly. A five step watercolor tutorial for painting a Tiger Swallowtail Butterfly from start to finish.


Recent Articles
-
You Can Paint Butterfly Art!
 Unlock your creativity and start painting butterfly art. Discover the techniques of painting realistic butterflies. Link to 5 different pages on how to paint butterflies with tips and valuable insight…
 -
Learning to Paint
 Learning to paint is fun! Millions of people are painting and you can too!
Use these five easy things to jump start your painting journey.
Learning to paint is fun! Millions of people are painting and you can too!
Use these five easy things to jump start your painting journey. -
Easy Butterfly Painting: Watercolor Monarch Step-by-Step Tutorial
 Get creative with an easy butterfly painting tutorial. Discover the joy of drawing and painting a vibrant Monarch Butterfly with simple watercolor techniques.
 -
Overcoming an Artist's Block
 How to survive an artist's block. All artists can have blocks or delays, but we get over it.
What is an art block? How do we get started painting again?
How to survive an artist's block. All artists can have blocks or delays, but we get over it.
What is an art block? How do we get started painting again?
Recent Articles
-
You Can Paint Butterfly Art!
Unlock your creativity and start painting butterfly art. Discover the techniques of painting realistic butterflies. Link to 5 different pages on how to paint butterflies with tips and valuable insight… -
Learning to Paint
Learning to paint is fun! Millions of people are painting and you can too!
Use these five easy things to jump start your painting journey. -
Easy Butterfly Painting: Watercolor Monarch Step-by-Step Tutorial
Get creative with an easy butterfly painting tutorial. Discover the joy of drawing and painting a vibrant Monarch Butterfly with simple watercolor techniques. -
Overcoming an Artist's Block
How to survive an artist's block. All artists can have blocks or delays, but we get over it.
What is an art block? How do we get started painting again?
ArtbyCarolMay.com
All Rights Reserved
HOME - BLOG - CONTACT - SITEMAP - PRIVACY - AFFILIATE