- Home
- Paint a Butterfly
- Easy Butterfly
Easy Butterfly Painting for Beginners
Get creative with this easy butterfly tutorial of a Monarch.
Go on a journey of creating your own masterpiece with this guide to drawing and painting a Monarch Butterfly.
Nothing captures the essence of nature's beauty quite like butterflies, a symbol of transformation, joy and freedom.
Want to see more butterfly projects? Browse Paint a Butterfly for the full set of butterfly painting tutorials.
 Paint the majestic Monarch.
 Paint the majestic Monarch.
How to Draw and Paint an Easy Butterfly
This step-by-step tutorial is for budding artists or anyone wanting to paint an easy watercolor.
Follow the Easy Steps to Draw a Butterfly
It's important to start a butterfly painting with a drawing.
Draw the butterfly before jumping into paint. This greatly streamlines the painting process.
 It's good to have a reference for drawing.
Lightly Do a Pencil Drawing
Your pencil drawing will not be dark like the photos below. They are done with ink so the lines will show in the photos.
The guidelines are red to accentuate them. Do your guidelines with regular graphite pencil.

Draw a center guideline.
Draw the butterfly's body on the guideline. Don't forget its antennae.

Add 2 guidelines for the angle of the wings - from the shoulders down to about 1/4 of the paper's width.

Add 2 guidelines from the shoulders out to about 2/5 of the paper's height.
Then sketch the two top wings.

Sketch the bottom edge of the two back wings.
Erase all the guidelines.

Draw the veins on the fore-wings.
1) Draw the large upper vein section.
2, 3 and 4 - Attach 3 sections to the bottom of the first vein section.
Notice, these three sections are parallel with the back edge of the wing.

Veins and trim on back wings.
1) Start with the long vein next to the butterfly's body. (#1 red vein)
2) Attach #2 vein to vein 1.
3) Draw vein #3 from vein 2.
4) Draw the trim on both back wings.
Your finished butterfly drawing will look something like this.
 Finish drawing the butterfly.
The Painting Materials
Here's the materials we use:
- 5x8 inch watercolor paper (larger if you wish)
- #4 and #8 round brushes
- Cadmium Orange and Cadmium Red Light
- Ultramarine Blue and Burnt Sienna
- Water-resistant black ink pen
Transfer Your Drawing
Transfer your finished drawing to the watercolor paper. My preference is graphite paper made specifically for artwork.
Don't use carbon paper because watercolor won't cover the carbon marks.
Make This Painting Easy
On the watercolor paper, go over the lines with water-resistant black ink.
Then we won't have to paint all the fine, black veins later. That's what makes this painting easy.
5 Easy Painting Steps
Butterflies are awesome and it's such a joy to paint them.
Step #1
Use a #8 brush for the entire painting, except for the white spots and small designs on the wing edges. Paint them with a #4 brush.
 #1 Paint the orange on the fore-wings.
Paint the four orange sections of each fore-wing. Paint right over the black veins.
The fore-wings are a redder orange than the hind-wings.
Cadmium Orange is a yellowish orange. We want a reddish orange.
You can make red-orange by mixing a little Cadmium Red Light into Cadmium Orange.
Step #2
Moving to the hind-wings, we paint them with Cadmium Orange. It's a nice bright orange.
 #2 Paint the orange on the back wings.
Don't worry about trying to get the paint on smooth and all the same. Variations make the painting more interesting. They show it's a painting, instead of a photograph.
Winsor Newton cadmium colors do not actually contain any cadmium.
Step #3
Next, we start painting the black parts of the butterfly.
Black is easy to mix with Burnt Sienna and Ultramarine Blue. A mixed black will have some variations that add interest. You certainly may use tube black.
 #3 Paint the body and start trimming the wings.
Paint the butterfly's head and body. Paint the body darker on the sides. Use less paint on the top of the body to give it a rounded form.
If the body gets painted too dark, dab some of the paint off the top of the body with a clean, damp brush.
Paint the wide black inside edge of the fore-wings.
The black parts look a bit out-of-place at this stage. But as we paint more of the wings, they will fit in.
Recommended colors for your watercolor palette.
Step #4
Continue painting all the black trim on the wings.
It's starting to look like a butterfly. That's the joy of painting.
 #4 Complete the black edges of the wings.
Step #5
Paint the white designs on wings.
 #5 Paint the white spots and dashes.
Paint the white spots and dashes in the black edge of the wings. The white markings may be handled in either of two ways:
- Paint around the spot, leaving the white paper. The spots will look nice and white.
- Paint white spots or dashes on the dried black paint with Titanium White watercolor or white gouache. The white is not as bright, but it's easier than painting around all the spots.
It's your choice, either way is fine. You can see the difference between the two methods in the photo above.
There are more ways to save the white paper.
The Joy of Painting Butterflies!
Have fun with this easy butterfly painting. Paint the Monarch or use the same steps to paint other types of butterflies.
Explore the treasure trove of painting guides, ideas and tips to feed your desire to create.
Looking for more butterfly painting ideas? Visit Paint a Butterfly to explore the full collection of butterfly tutorials in watercolor and oils.
Explore More Tutorials
Painting Mixed Media Creates Awesome Art!
Feel the joy and freedom of painting mixed media. Create awesome paintings with this easy painting technique of mixing acrylic and watercolor paint mediums.
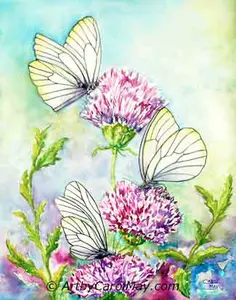
Painting Butterflies with Watercolor Flowers Tutorial
Enjoy painting butterflies in watercolor with a step-by-step tutorial combining butterflies and flowers in a natural composition by painting artist Carol May.
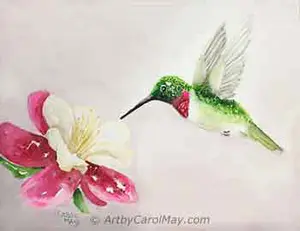
How to Watercolor: Paint a Beautiful Hummingbird
How to watercolor like a pro! This captivating tutorial guides you through every step, from choosing materials to painting a breathtaking hummingbird scene.
Watercolor for Beginners: Paint Your Dreams
Watercolor for beginners: transform your dreams into reality with our comprehensive resource to empower you as you enter the captivating world of watercolor.

Recent Articles
-
Fix Common Mistakes
May 01, 26 01:00 PM
 Every artist encounters common painting mistakes. There are times when a painting just does not seem to work. Most often it's a design issue. The problems come back to composition, focal point, and va…
 -
Find Your Art Style
Apr 24, 26 01:00 PM
 Finding your style isn’t about picking a label or copying someone else. It’s about noticing what you’re drawn to - and repeating a few things long enough that your choices become consistent. Go from l…
 -
Create Your Own Art!
Apr 14, 26 01:16 PM
 If you have been following the step-by-step lessons and you are ready for the next step. Begin creating your own paintings with confidence. Learn how to plan a painting, solve common painting problems…