- Home
- How to Oil Paint
How to Oil Paint a Step by Step Tutorial
Do you want to learn how to oil paint? You're at the perfect place for information.
Oil paint offers a unique richness and depth that can transform your artwork. Oils are an easy and pleasant medium to use for our modern masterpieces.
Create a modern masterpiece of a cuddly Teddy Bear - from the first drawing to the final highlights.
 Oil painting is easy!
 Oil painting is easy!
Let's Do an Oil Painting Step by Step
The 2 Rules of Oil Painting
There are just two - three good practices (rules) for oil painting.
The Paint
Oil painters say to paint "fat over lean". Oil paint of course contains "fat", the oil used in its manufacturing. Painting slow-drying over fast-drying is the same thing.
Why do we paint oils this way?
If a layer of thinned paint is painted on top of fat, non-thinned paint - the thin paint dries quickly, while the fat paint continues drying underneath.
This creates a good chance of the completed painting cracking in the future.
The Values
Values are the light and darkness of paint.
It's not entirely impossible to paint dark colors over light colors without the light color showing through - but it's difficult.
However, it's easier to cover dark colors with thick, opaque light paint.
So, to make it easier artists paint oils "dark to light". Paint the dark colors first and save the lighter colors for later in the painting.
Three Steps of Oil Painting
Fat over lean is worded backwards. It says the last thing we do - first. Actually we paint the fat after the lean.
Instead of saying it backwards, I like saying it in the order we actually paint "thin to thick". That' reminds us how do oil painting.
How to Oil Paint: THIN to THICK & DARK to LIGHT (The oil painting rules are same for alkyd and acrylic paintings.)
We will:
- Paint THIN, DARK colors first. (The paint is thinned with a solvent.)
- Paint the medium values with medium thickness, use a medium as needed.
- Paint THICK, LIGHT colors last. (The paint is straight out of the tube with nothing added.)
How to Oil Paint a Teddy Bear
This tutorial is an excellent way to get the feel of oil painting.
It will guide you through the crucial steps of oil painting, so you get the most out of this classic medium.
Your Supplies for This Tutorial
- 3 Colors: your choice of any blue color, Burnt Sienna, and a warm yellow (Indian Yellow, Cadmium Yellow Medium or Cadmium Yellow Light).
- Painting Support: This painting is on an 11x14" canvas. You could use a canvas paper pad or a canvas board.
- Brushes: Flat or bright brushes are both ideal for oil painting. In this painting I used #3, #4 and #5 flats.
- Thinning and Clean-up: Gamsol odorless mineral spirits is the solvent used for thinning the paint and cleaning brushes.
How Do We Start an Oil Painting?
- It's good to have a reference to paint. Use actual things or a photo.
- Many times, artists will do thumbnail sketches to figure out the composition, forms and values. But for our tutorial, we will be painting from a photo that has all that done for us.
- We start by putting a line drawing on the painting surface. Use paint that has been thinned with a solvent.
Alternately, do a light pencil drawing directly on the canvas.
Or do a drawing on paper and transfer it to the canvas with graphite paper. That's what I did.
More tips on how to start a painting.
 Use a painting reference.
 Put a line drawing on the canvas.
1. Paint Thin, Dark Colors
Mix a brown by combining blue and Burnt Sienna.
Make the mixture black for the eyes, nose and feet by adding additional blue.
Thin the paint with solvent.
 Paint the thin, dark colors.
Paint the darks on the body with the thinned brown paint.
Paint the eyes and foot pads black. Add more thinner for the grey nose.
The book is a dark brown and the pages are lightened with extra thinner.
How Do We Fix Mistakes?
It's easy to correct mistakes in the thin stage.
Clean the brush with solvent. Blot the excess solvent on a paper towel.
Brush away the mistake with the clean damp brush. Repeat if needed.
 Thin paint is easy to remove.
When it's thick paint, scrape the thick paint off with a palette knife.
Clean the brush with solvent. Blot the excess solvent on a paper towel.
Brush away the remaining paint. Rinse and repeat, as needed.
Paint the Background
The background is painted in one shot, so we won't use solvent. If your paint is too stiff, thin it with some medium.
- Mix your blue into a pile of white paint.
- Don't thoroughly mix the color on the palette, unless you desire one even color.
- Doing some mixing on the canvas, it gives the painting an artistic appeal.
 Paint with artistic brush marks.
Notice the value difference between the left and right side.
Start painting with the darkest color in the upper right corner.
Lighten the blue with more white as you paint toward the left.
Also, lighten the blue as it goes down to where the bear is sitting.
Get more tips on how to mix colors.
The solvent will make the dark colors dry quickly, so we can start painting the medium colors.
2. Paint the Medium Colors
Mix Burnt Sienna with white and a touch of blue to get a variety of light browns.
Start painting the bear with the medium value colors.
The red arrows point to places painted very lightly or left unpainted for the next step. These will be highlight areas.
 Leave the lightest areas unpainted.
Paint over the darks with a very light stroke. Gently apply a thin layer of paint that allows the dark color to show through.
The darks should be fairly dry so they won't mix with the lighter paint. If they do mix - look under the left ear, the colors mixed. So, what do we do?
Paint away from the dark color, then stop and wipe your brush on a paper towel. Reload with clean medium color to continue painting.
Only wipe the dirty color off the brush with a dry paper towel. Don't clean it with solvent because solvent on the brush will pull the paint off the next few strokes.
3. Paint the Thick, Light Colors
The lightest colors are paint only, no medium added.
- Mix Burnt Sienna and white for the left side of the painting.
- Mix a warm yellow and white for the lightest colors on the right side.
- Load the brush with plenty of paint.
 Tap the light colors on creating fur.
Tap the canvas lightly on the edge, corner and/or the tip of the brush. (Do not use a painting stroke.) Change the position of the brush each time it touches the canvas.
The light colors will mix with the medium colors. When you run out of paint, reload the brush again with plenty of paint.
Continue touching the canvas and lifting the brush up after each touch to create the fur texture.
Paint the Bear's Feet, Book, and Nose
We know how to oil paint now. So, let's do all 3 steps (in the photo below).
- Paint thin, dark color
- Do the medium colors
- Highlight with thick, light colors
 Paint fat over lean and thick over thin.
Feet:
- #1 First, paint the shadows under the book with thin, dark paint.
- #2 Next, mix and paint a medium shadow color (blue, Burnt Sienna and white).
- #3 Last, mix and paint warm highlight colors on the light part of the feet.
Book:
- The left pages were painted with warm, yellow white.
- The right page was painted with a light medium color used on the feet. Then warm white was painted above the medium color.
- To create more interest, brown was intermittently painted on the left side of the book cover.
Nose:
- #4 Mix a little of the foot's shadow color with white to get a warm, pale grey. Use it to shadow the left side of the bear's muzzle.
- The right side of the nose is a warm yellow white.
Start Painting What the Bear is Sitting On
Mix a thin, dark blue for the dark parts of the bear's seat.
Paint the dark shadows.
 Paint the shadows on the bear's seat.
Finish the Painting
Now you know the basics of how to oil paint.
 Your oil painting is finished.
Only one more thing to paint.
- Paint the medium colors on the bear's seat. As you paint, gently paint into the shadows to make a smooth transition.
- Paint the highlights last and gently blend them into the medium colors to make it resemble fabric.
Touch up anything that catches your eye and your oil painting is complete.
Frequently Asked Questions
You may be wondering ---
What's the Difference Between Oil, Alkyd, and Acrylic?
What's the Difference Between Oil, Alkyd, and Acrylic?
Oils are the rich, classic paint used since the 17th century. They are slow-drying, long-lasting and revered for their beauty.
Alkyds are a modern "oil" paint manufactured with alkyd resin instead of oil, so they dry within 24 hours.
Acrylic is a popular fast drying, water-based paint.
Visit the Best Painting Medium page for a chart to Compare the Popular Mediums.
How Long Do Oils Take to Dry?
How Long Do Oils Take to Dry?
Oil paintings may take a few days, up to a week or two (depending on the weather, color, and how thick the paint is) to dry for safe handling. They may take up to six months or more to thoroughly dry.
The various colors dry at different rates. For example, Burnt Umber, Raw and Burnt Sienna dry faster. The cadmium and quinacridone colors dry slower.
Griffin Alkyd paint made by Winsor Newton dries overnight or within 24 hours. All the colors dry at the same time to a soft sheen without any sunken spots (no need for varnish).
That's why all my "oil paintings" are fast drying alkyd paint.
Do Oil Paintings Have to Be Varnished?
Do Oil Paintings Have to Be Varnished?
Oil painting may be varnished. Different colors dry to differently, matte, flat or a glossy finish. Varnish gives all the colors the same finish.
If the painting requires cleaning in the future, the varnish protects the paint from the cleaning products and abrasion.
What Medium Do We Use?
What Medium Do We Use?
Oil paint is most often thinned with linseed, sometimes walnut oil. Liquin medium speeds up the drying time. Stand oil make it thick and sticky.
Do We Use Turpentine for Oil Painting?
Do We Use Turpentine for Oil Painting?
For years turpentine was used for thinning oil paint and cleaning the brushes. It is expensive and has a noxious odor! Today we have other alternatives.
Odorless mineral spirits is much better! The brand name Gamsol is considered the safest solvent for studio painting. Keep in a covered container when not in use to keep it from evaporating.
Be sure and paint with adequate ventilation and light. Visit the Home Art Studio page for more details.
Your Next Oil Painting Tutorials
Do you want to do another oil painting?


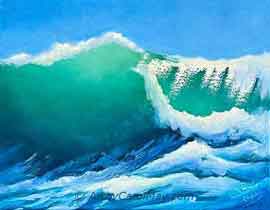
Paint a Horse Running in the Surf
This tutorial uses the same rules of oil painting: Paint dark to light and paint thin to thick.
 Paint with the rules of oil painting.
This exciting painting is suitable for intermediate artists.
First you underpaint by blocking in the dark colors of the horse.
Then block in the background water and paint the sky.
Paint thicker and lighter, complete the beach and the ocean waves.
After the sky is dry, highlight and detail the horse.
Have Fun Oil Painting!
More Oil Painting
Painting with a Limited Palette: Master Color Harmony
Discover the art of painting with a limited palette. Tune in to color harmony & craft a fun, colorful, harmonious step-by-step painting with only four colors.
Oil Painting Supplies at Art by Carol May
All about oil painting supplies, what do we need to do an oil painting, best paints, brushes, colors, what to paint on, what are alkyd paints, clean up and more
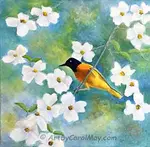
Oil Painting for Beginners: Step-by-step Tutorial
Start oil painting for beginners with an easy step-by-step tutorial. You can learn about oil paints and how to use them while painting a pretty Baltimore Oriole
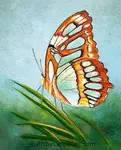
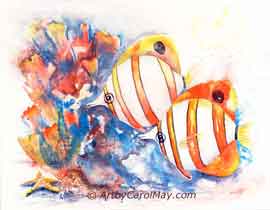
How to Paint a Butterfly in Oils: Malachite Tutorial
Learn how to paint a butterfly in oils with this step-by-step Malachite tutorial for beginner and intermediate artists by artist Carol May

Recent Articles
-
Fix Common Mistakes
May 01, 26 01:00 PM
 Every artist encounters common painting mistakes. There are times when a painting just does not seem to work. Most often it's a design issue. The problems come back to composition, focal point, and va…
 -
Find Your Art Style
Apr 24, 26 01:00 PM
 Finding your style isn’t about picking a label or copying someone else. It’s about noticing what you’re drawn to - and repeating a few things long enough that your choices become consistent. Go from l…
 -
Create Your Own Art!
Apr 14, 26 01:16 PM
 If you have been following the step-by-step lessons and you are ready for the next step. Begin creating your own paintings with confidence. Learn how to plan a painting, solve common painting problems…