- Home
- Improve Paintings
- Start a Painting
How to Start a Painting: What Do We Paint First?
How do we start a painting? What do we paint first - the background, the main subject, do we start painting in the back of the painting, the front or where?
What is the common sequence of painting a painting? How do we start a watercolor or an oil painting?
This page focuses on the steps of painting, not on choosing subjects or materials.
- If you haven’t chosen a subject or materials yet, start with: Plan a Painting.
- If you’re looking at a blank canvas and wondering what to paint first, stay here.
 What do we paint first?
 What do we paint first?
How to Start a Painting
The logic of what to paint and when:
How to Start a Landscape Painting
Have you ever looked at a blank canvas or paper and thought what do I paint first?
The logic is to start painting things behind or underneath first. Then paint what's in front or on top of them.
Paint from the background to the middle ground, and the foreground last.
It certainly is not the only way to do it, but it makes sense to paint what's behind before painting anything closer to us.
The Sequence of Painting a Landscape
Start painting at the top and paint down to the bottom of the painting.
As a side note - overlapping items is a great way to create depth and distance in our paintings.

The sections of this painting show the progression of what to paint - when.
1. Paint the things farthest away like the sky, distant hills or water.
2. Start painting forward. The foliage is closer, so it overlaps the sky.
Blend the top edge of the foliage softly into the sky to help it recede.

3. The water was painted before the buildings and boat because they rise up out of the water.

4. The buildings were painted. Note how they overlap the foliage of step 2.

5. The boat and its reflection are painted into the water of step 3.

6. The foreground foliage on the sides of the painting was painted overlapping the water.

7. Finish details like highlighting the water and putting shadows at the base of the grasses.
Painting from the top - down (back to front) is a good way to paint landscapes.
After we are more familiar with painting, we may approach each painting differently. For example, the sky may be the last thing to be painted.
It's up to the artist and each individual painting, but this is a logical way to start and paint a landscape.
Look at the painting below and imagine painting in the sequence and why.
1. Start at the top with the most distant items.
2. Paint what overlaps them.
3. Come forward and paint the water.
4. Paint the buildings.
5. Do the boat and reflection.
6. Paint the foreground foliage.
7. Finish the highlights and details.
 Paint from the background to the foreground.
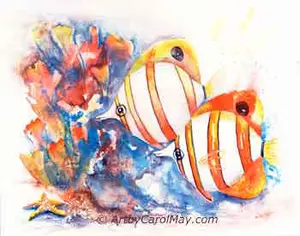
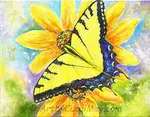
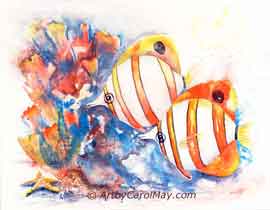
How Do We Start Close-up Subjects?
Where do we start a closeup painting like people, a butterfly or an animal?
Paint the subject first. Then paint the background around the main subject.
 The butterfly was painted first.
 Then the background was painted.
After the subject has been painted, it's easier to see how to use values and color to contrast and highlight the subject.
Sometimes I paint the background first and the subject second. Each painting is an individual - either way is correct.
We covered the order of painting the parts of a painting. Now, what order do we use to apply the paint?
Paint Any Painting with 3 Easy Steps
There are generally three steps for painting any subject or any medium.
- First, start with an underpainting or block-in. This establishes the values, composition and sometimes the colors.
- Second, paint the painting, the way things will be in the finished painting.
- Third, complete the details, do highlighting and any necessary touch-ups.
We can start painting any medium with these three steps.
An underpainting is often done with Burnt Sienna.
Blocking-in (this example) covers each area with their general color.
Both techniques use thinned paint to establish the values and composition.
After the painting is laid out, it's time to relax and enjoy painting.
 1. The colors were thinly blocked-in.
 2. Paint the painting
The belly is shadowed, wings, and legs defined, background painted, and he got a perch.
 3. Finish with details
His eye, and beak are painted, chest got more defined and the perch is shadowed.
Let's see how these three steps apply to any medium - with variations in the order.
How to Start a Watercolor
Watercolor, oil and acrylic all use the 3 painting steps, with individual variation.
Watercolor is painted from light to dark.
- Start watercolor paintings with thin, light layers of paint.
- Add layers and the darken the colors.
- Detail and finish the painting.
In this painting, I painted the hummer before doing the background.
You may want to work on the entire painting by including the background.
 1. Start with light colors.
 2. Continue with more layers.
 2. Paint details and darkest colors.
Common Watercolor Situations (quick fixes)
Use these quick fixes to keep painting.
The paint spreads everywhere without control.
Quick fix: Control the water. Blot extra water out of the brush before you pick up paint. Wait for the
shine to go off the paper before you apply the paint.
My first wash is not even/streaky.
Quick fix: Use a large brush and evenly pre-wet the paper. Work fast and don’t go back into areas that are starting
to dry.
I get nervous doing the first layer.
Quick fix: Pause and
re-check your value plan. Keep the first layer light. You go darker later, but it’s
harder to go back to clean light colors.
I lost my light/highlight areas.
Quick fix: Decide your lightest
lights before you start and protect them. Paint around them, lift paint gently, or use masking to protect the area in advance.
My colors look dull/muddy.
Quick fix: Keep the color clean by using a clean brush in the wells of color. Rinse your brush clean between mixes. Use fewer colors in a mix (usually only 2).
What Next?
Paint an easy hummingbird in Watercolor Hummingbird (different from the one above).
What Do We Paint First in Oils?
Oil, alkyd, and acrylic are painted in the reverse order of watercolor.
Paint oil, etc. from dark to light.
Dark oil colors are difficult to paint over white and other light colors. However white is opaque and easily covers darker colors.
- So, start painting oils with the darkest colors, values first.
- Paint the intermediate values.
- Finish with the lightest colors and details.
 Start with the dark colors.
 Then, paint the middle values.
 Do highlights and details last.
Oil Painting Situations
Oil painting situations are fixable - here are a few.
I don’t know whether to start with background or subject.
Quick fix: Paint landscapes from background to foreground. A close-up like a portrait, paint the subject first so you can judge the background colors and value against it.
My drawing disappears under the first application of paint.
Quick fix: Do a thin underpainting first to map out the painting. Then confidently paint the next layers by following "the map".
My light colors get dirty (especially whites).
Quick fix: Reserve your brightest lights until later. If you need to establish the light early, use a grayed light and save the pure highlight for the end.
The paint feels sticky or won’t move nicely.
Quick fix: Use a small amount of medium/solvent (depending on the step) and avoid overworking. Fresh paint over fresh paint blends and moves easily.
I find myself paint the details too soon.
Quick fix: Paint big shapes in the first layer: 3 value masses with general colors. Details go on top of a solid block-in; otherwise, you’ll repaint them repeatedly.
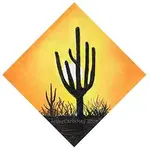
You Can Start Painting
Painting a Dog (pictured above) is an excellent oil tutorial for beginners.
Your Painting Checklist
Here's a handy checklist you can refer to for your future artwork.
Landscapes: Start at the top and paint down, overlapping the items to create distance.
Close-up items: May be started with either the subject or background.
3 easy steps of painting: 1) Cover the surface with thinned paint. 2) Paint the painting. 3) Complete the details and touch-ups.
Watercolor: Paint from light to the darkest colors.
Oils: Begin with the dark colors and paint to the lightest colors last.
If you want more ways to improve your paintings, go back to the main guide and choose the next skill you want to work on.
Start Painting - It's Fun!
More About Painting
Find Your Art Style: Your Art Style Is a Part of You
How do you find your art style? Can we do anything to speed up the process? Practical advice on finding and developing your personal painting style.
Artists Block: Tips on How to Get Back to Painting
How to overcome an artists block. All artists can have blocks or delays, but we get over it. What is a painting art block? How do we get started painting again?
Painting Daily Improves Your Art Skills
Can painting daily really make you a better artist? Regular painting will put your art into overdrive! You don’t have to paint perfect. Just paint more often.
Recent Articles
-
Fix Common Mistakes
May 01, 26 01:00 PM
 Every artist encounters common painting mistakes. There are times when a painting just does not seem to work. Most often it's a design issue. The problems come back to composition, focal point, and va…
 -
Find Your Art Style
Apr 24, 26 01:00 PM
 Finding your style isn’t about picking a label or copying someone else. It’s about noticing what you’re drawn to - and repeating a few things long enough that your choices become consistent. Go from l…
 -
Create Your Own Art!
Apr 14, 26 01:16 PM
 If you have been following the step-by-step lessons and you are ready for the next step. Begin creating your own paintings with confidence. Learn how to plan a painting, solve common painting problems…