- Home
- How to Paint Watercolor
- Watercolor Hummingbird
How to Paint a Watercolor Hummingbird
Watercolor doesn't have to be scary.
Paint a Rufous Hummingbird step by step and see how easy it is to use watercolor.
We will paint him visiting a big yellow flower.
 Paint a Rufous Hummingbird
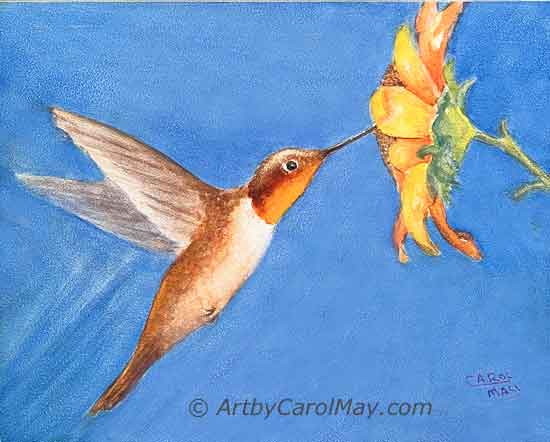 Paint a Rufous Hummingbird
What Is Watercolor?
Didn't I use watercolor paint in grade school?
Yes, many of us probably did because watercolor is a clean, easy paint to use.
Many of the colors are transparent, which adds to the beauty and charm of wonderful watercolor.
How to Use Watercolor
Watercolor is easy to use and cleans up with water.
We don't have to purchase anything special to make it work. All we need is paint, brushes, and a container of clean water.
Use the water for painting and washing the brushes.
- The more water we add, the lighter the colors will be.
- If we want intense colors, use less water with more paint.
Two Watercolors
Watercolor paint comes in two different forms.
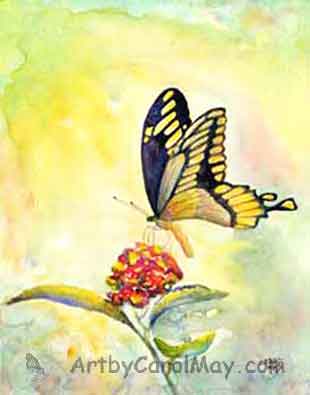 Painted with tube colors
Pan watercolors are pressed into cubes, dried and usually placed in a container with a lid.
To use a pan watercolor, rub a wet brush on the selected color cube. The brushes tend wear out faster from all the rubbing.
Pan watercolor is an easy watercolor for beginners. Plus, they are very handy for travel and painting outdoors.
Tube watercolors have some glycerin added to keep the paint flexible.
Tube watercolors are my chosen watercolor paint. They produce more vibrant colors in the finished paintings.
What Colors Are Best?
Start with the three primary colors, red, yellow and blue. A warm and cool version of each gives us flexibility for mixing more colors.
- Red: (warm red) Cadmium Red and (cool red) Permanent Rose
- Yellow: (warm yellow) New Gamboge or Cadmium Yellow Light and (cool yellow) Lemon Yellow
- Blue: (warm blue) Ultramarine Blue and (cool blue) Phthalocyanine Blue - Phthalo Blue for short
See my recommended colors of an extended palette of 12 colors.
What Do We Paint Watercolor On?
Watercolor is traditionally painted on 100% cotton rag paper.
140# cold-pressed watercolor paper is a good for learning to watercolor. It needs to be stretched, otherwise it will buckle when water is put on it.
Watercolor paper in a block has the sides of the paper fastened down to prevent buckling. After the painting is complete and dry, remove the single sheet from the block.
Paper watercolor paintings need to be matted and framed under glass.
Can We Paint Watercolor On Canvas?
Yes, watercolor may be painted on canvas.
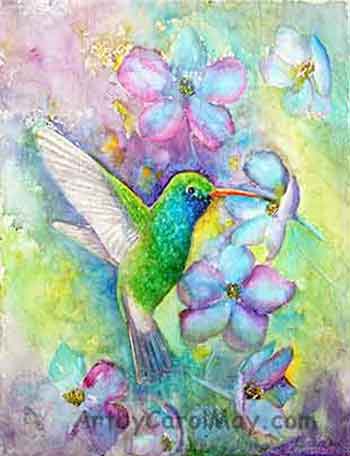 Hummingbird on canvas
But - only use canvas specifically labeled for watercolor.
Before using the canvas, brush a good bit of water onto the canvas to break the surface tension.
Otherwise, the paint tends to slide around.
Let the water soak away before starting to paint.
When the painting is finished and thoroughly dry, seal the painting with a spray fixative.
Beginning watercolor artists will find it easier, to paint on watercolor paper or a prepared panel.
What Are Watercolor Panels?
Hardboard panels made for watercolor are my favorites.
Almost all of my watercolor paintings are done on Aquabord made by Ampersand.
When the painting is dry, I spray it with Krylon fixative. The finished painting can be framed without a mat or glass.
Mistakes are easier to remove from Aquabord than from paper. Tips on how to fix watercolor mistakes.
What Brushes Do We Use?
Watercolor uses soft brushes made out of animal hair or a soft synthetic fiber.
We can do all our watercolor painting with just two or three brushes.
- #7 or 8 round brush is a good all-around brush
- 1" flat brush used to wash in large areas
- Optional, 1/2" angle brush for straight edges and fine lines
The watercolor brushes I have been using for around twenty years have never seen soap. I just swish them around in water, shake them to make them point up. Then blot the excess water away and lay them down flat to dry.
Basic Watercolor
Watercolor is painted from light to dark.
- Start by painting the light colors first.
- Then paint the darker colors, as the painting progresses.
Why do we do that?
Most watercolor paints are transparent, so light colors are not able to cover darker colors. Even if we use opaque colors, when they are mixed with water, they will not sufficiently cover dark colors.
That makes sense doesn't?
Let's get to painting.
Paint a Watercolor Hummingbird
It's great to read about watercolor, but doing is learning.
Supplies
This demo is on an 8x10 Aquabord panel. It certainly may be painted on any size watercolor paper or watercolor canvas.
Colors
Using a limited number of colors automatically creates color harmony.
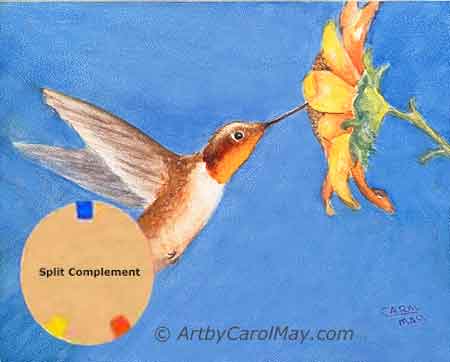 Painted with blue, orange and yellow.
This painting uses a split complement color scheme of only 3 colors.
- Blue: Use any blue of your choice.
- Yellow: Lemon Yellow, Cadmium Yellow Light or New Gamboge
- Orange: Burnt Sienna or Quinacridone Sienna
If you want to use a different color scheme - check out the popular color schemes for paintings.
Brushes
We will be painting the hummingbird with a #7 round watercolor brush. The background is done with a flat brush.
Sketch out the hummingbird on a separate paper. Then transfer the drawing to your painting surface with graphite paper.
You may draw on the painting surface, but be careful because erasing can damage watercolor paper.
Paint the Hummingbird's Throat
The light source in this painting is coming from the right.
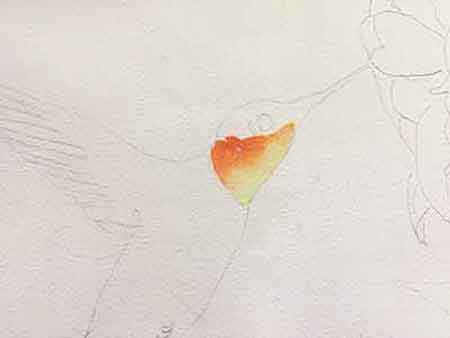 Paint the throat.
Using the round watercolor brush, pre-wet the throat area.
Paint a pale yellow on the side toward the light.
While the yellow is still wet, put orange on the opposite side.
Allow the two colors to mingle together.
Watching the beautiful colors flowing together is one of the joys of painting watercolor.
Paint the Body
Wet the body with clean water from your brush. The wet area will have a sheen.
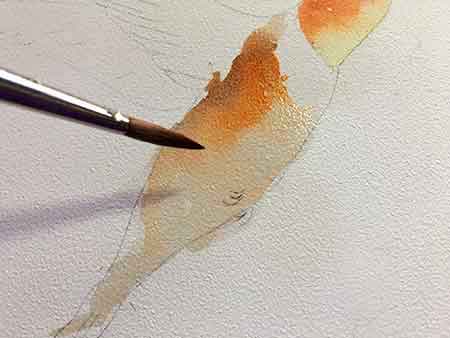 Paint the hummingbird's body.
The paint will spread into the wet areas. Painting wet into wet is a basic watercolor technique.
Mix blue and orange to make brown. Add water to make a light brown.
Paint the shadow (left) side of the body. As we paint toward the light, keep adding more orange.
Note: Leave the area between the throat and body white. Don't wet the area so the body paint won't flow into it.
Paint the Wings
Paint the first layer on the wings.
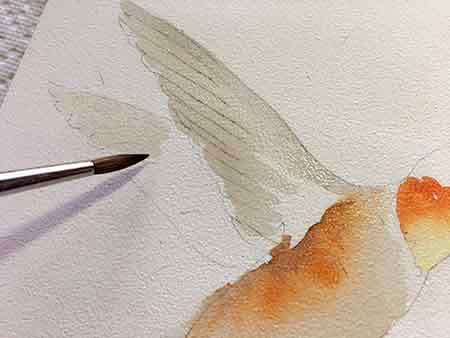 Painting the wings.
Mix a very light grey-brown with the orange and blue.
Use more water to make it a light color.
Paint the forward wing.
Colors get lighter and cooler, as they go into the distance.
Add a bit more blue to make the color greyer to make the back wing look farther away.
Step 2 on the Wings
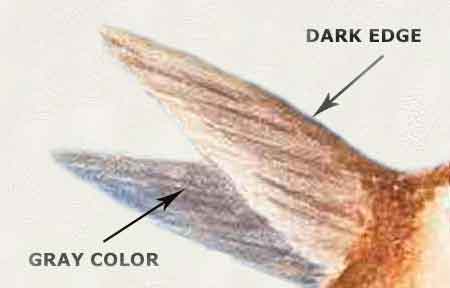 Layer on darker colors.
This image is from a later, but I wanted to put the wing information altogether in one place.
You can see the body has another layer of paint. When you paint more on the body go out onto the wings.
Use variations of brown on the near wing and paint the top edge darker.
The far wing will be lighter and grayer to place it farther back.
Now the Head
Mix a tiny bit of blue with the orange to get an orange-brown.
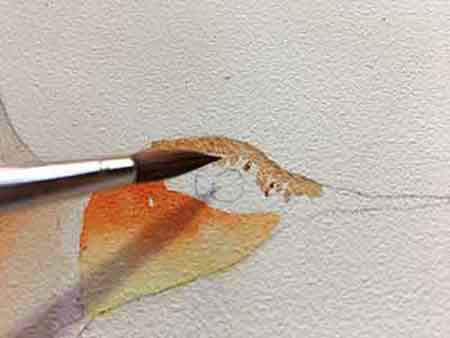 Paint the head with stippling strokes.
The top of the head is painted on dry paper.
Paint the top of the hummer's head with the brush tip. This leaves stippling marks to simulate the short feathers.
Leave the eye, around and behind the eye white (unpainted).
Leaving the white of the paper is an important watercolor technique.
Find out more about painting white in watercolor.
Paint the Eye, Beak and Feet
Add more blue to your blue and orange mixture to make a black.
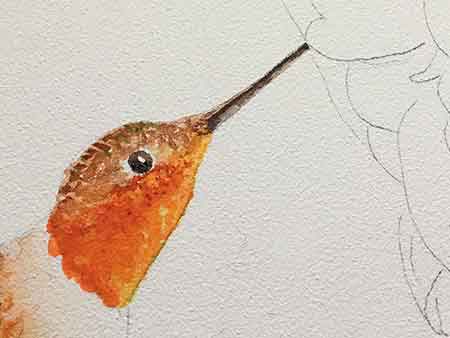 Paint the eye and beak.
Paint the eye black leaving a white highlight. Leave the white spot behind the eye and a slight bit of white around the eye.
Paint the beak with one dark line down the center.
Paint the little dark feet with the same mixture.
Paint more orange on the throat, leaving the yellow showing on the side toward the light.
Painting the Flower
Freely paint the flower petals. Use a variety of oranges and yellow, leaving some white spaces for a little sparkle.
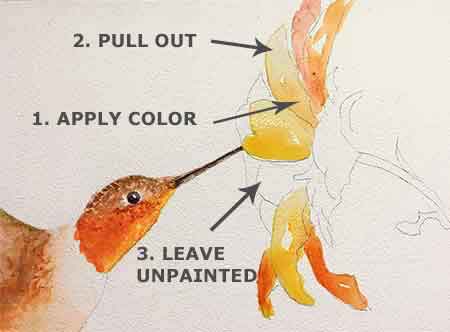 Paint the flower petals.
1. On some petals, put paint on one end of the petal.
2. Rinse the brush, then use the damp brush to pull the color toward the other end of the petal.
This makes the petal color go from full color to lighter and lighter.
3. The orange petal is not painted until the yellow petals on each side dry, so the colors wouldn't mix.
Paint the Green Flower Parts
Mix a variety of greens from your blue and yellow.
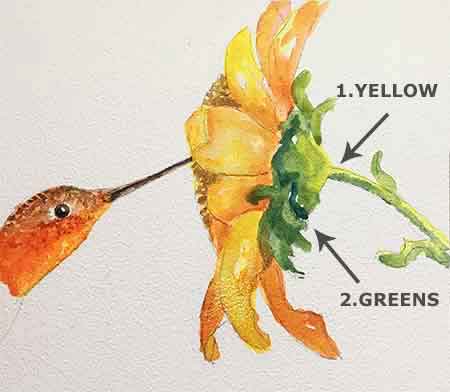 Paint the green sepals and stem.
Add more yellow for the sepals toward the light and the top of the stem.
More blue makes a darker green for the areas away from the light.
1. Paint the yellow-green parts first.
2. Then paint the darker greens.
Painting the dark greens while the light green is still wet results in soft edges.
Letting the light greens dry before painting the dark ones will make hard edges.
Paint the Flower Center
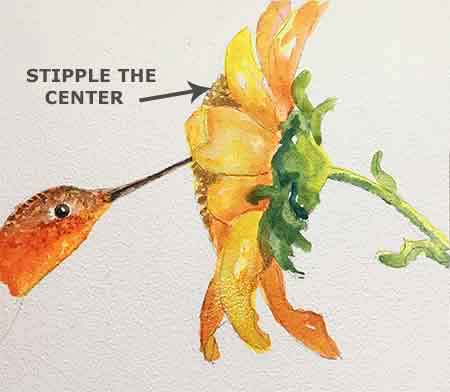 Paint the stamens.
Paint the center of the flower with a variety of light and dark brown, orange and yellow.
Paint light to dark:
- Paint the yellow or other light colors in first.
- Then stipple on the darker, drier colors with the tip of your brush.
- This portrays the stamens in the center of the daisy flower.
Learn more about how to mix colors.
The Background and Finish
Using a flat brush, dampen the background area with clean water.
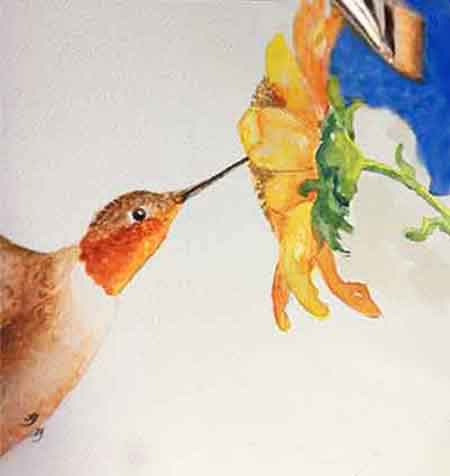 Paint the background with a flat brush.
Do one area at a time, so the forward painting edge stays damp to prevent a hard edge.
For example, I pre-wet and painted the upper right corner and below the flower before wetting and painting around the hummingbird.
It seems to work the best to not pre-wet right up to the edge of the bird or flower.
If there is water right up next to them, it makes the color pool up against their dry edge.
Instead, paint right up next to edge the bird and flower while you are painting on the background color.
Watercolor is Fun!
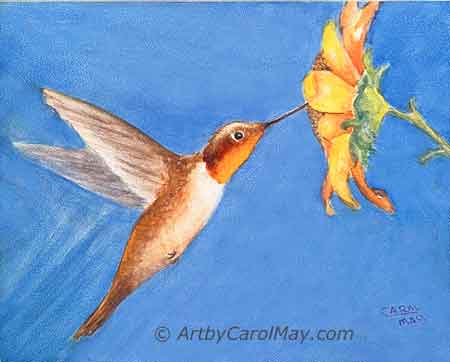 Finish the background with some zoom lines.
Go over the hummingbird again and darken and brighten any colors where you think need it.
Do any needed adjustment on the flower petals.
Where a petal is overlapped by a petal next-door, darken the petal behind. That makes it look behind the other petal.
Pull a damp brush through the damp background paint to make some marks behind the bird to simulate his flight movement.
Now It's Your Turn
Painting is so much fun! Watercolor is not hard. There are no mistakes that can't be fixed.
If we make a mistake, use a damp brush to put some water on the mistake. Rub it a bit with a brush and blot the loose color off with a paper towel. Repeat as necessary. It's that easy!
Jump In and Go for It and Have Fun!
Paint More Watercolor
Watercolor Art Supplies on Art by Carol May
These watercolor art supplies are tried and true. What works for me will work for you; best paint, what to paint on, brushes, palette, can you paint on canvas?
Glazing with Watercolor for Beautiful Effects
Glazing with watercolor is the key to rich, luminous paintings. Learn how to layer transparent colors effectively with our comprehensive guide and expert tips.
How to Paint Watercolor: A Complete Beginner's Tutorial
Learn how to paint watercolor with our fun, step-by-step tutorial. We'll guide you through basic techniques as you create a beautiful angelfish painting. Easy!
Watercolor for Beginners: Paint Your Dreams
Watercolor for beginners: transform your dreams into reality with our comprehensive resource to empower you as you enter the captivating world of watercolor.

Recent Articles


-
Home Art Studio
Oct 16, 26 12:00 PM
 What's the advantage of having a home art studio? When your creative juices are flowing your own painting space would be ready and waiting. Where would be a good place to put your art studio and what…
-
Paint a Fun Dog
Oct 02, 26 12:00 PM
 It's easy to paint this fun dog on canvas. This is a great way for beginners to start using oil paint. Follow the easy steps that use only three colors to paint this puppy dog. You can learn and use p…
-
The Big Three
Sep 18, 26 12:00 PM
 You can create good art using the big three painting fundamentals. Learn how to paint good art with good composition including a focal point, values and color choices. Use these three important fundam…