- Home
- Beginner's Watercolor
How to Paint Watercolor for Beginners
You can confidently learn how to paint watercolor for beginners!
This tutorial explains step-by-step how to paint a Ruby-throat Hummingbird visiting a fuchsia flower. Hummingbirds and flowers always make a great painting.
Watercolor is a clean, convenient paint you can use to create any picture you can imagine.
 Watercolor is a joy!
 Watercolor is a joy!
Watercolor for Beginners
Discover the joy and ease of watercolor painting.
This page covers the basics for the beginning watercolor artist:
Watercolor Basics
We do not have to mix or add anything to the paint - just water.
How do we adjust the colors?
- Light colors: Add more water to the color.
- Intense colors: Use less water with more paint.
#1 Rule in Painting Watercolor
Painting light to dark is the #1 basic rule of painting watercolor.
The dark colors cover lighter colors when we paint over them. But it won't work the other way around. Light watercolors with not cover the darker colors.
Use Clean Water and Pure Colors
The water and colors are the joy of painting watercolor.
Keep your colors clean!
 Use clean water.
Keep a container of clean water handy for painting and washing the brushes.
- Dip the brush into clean water and then into a color.
- Mix the colors on a palette, not in the wells of color, so the colors remain clean.
- Clean the brush with water between colors.
- When the water gets dirty, get fresh water.
Blot the excess water out of the clean brush on a paper towel, rag or sponge kept next to the water container.
Some artist use two containers of water. One to wash their brush and the other with clean water for mixing. I just change the water when it begins to look dirty.
Get Ready to Paint
It's great to read about painting watercolor, but let's start the hummingbird.
What Materials Do We Need?
This painting is on an 8x10 Aquabord.
Aquabord is a sturdy, archival board that may be framed without using a glass cover over the painting. It is my favorite painting surface for watercolors.
- 140# watercolor paper makes lovely paintings. It's the artist's choice.
- It is best to do and watercolor paintings with soft brushes. Use a round #7 brush for the hummingbird and a flat brush for the background.
Colors
This painting uses a semi-triad color scheme of yellow, red and green.
- Lemon Yellow or New Gamboge
- Permanent Rose
- Thalo Green, Viridian, or Sap Green
Painting with only three or four colors will produce unity and harmony in our paintings.
Many artists use pan watercolors. All of my watercolor paintings are done with tube watercolors. They produce vibrant colors. It doesn't take excess water to get them out of a dry cube of color.
How to select colors for a painting.
Sketch and Transfer the Design
Draw the hummingbird on paper and transfer it to the painting surface with graphite paper.
If you are good at drawing, you may do the drawing directly onto the painting surface.
Our goal is to eliminate erasures on the painting surface because they can damage the surface of the paper. Then the damaged area will collect and hold excess paint.
You may want to put some masking fluid on the fuchsia, the stamens and the edge of the white petals.
Paint Wet on Dry
Painting wet on dry is part of watercolor for beginners. This technique is normally used where we want defined, sharp edges.
In this painting we'll use it to make the look of feathers.
Start painting the top edge of the head and body with the tip of your brush simulating the small feathers.
 Start painting the green back and beak
Paint Light to Dark
Use a light yellow-green mixture. As you move down the head and body, start painting with a darker green (less yellow).
- Leave the hummingbird's typical white patch behind the eye.
- Shadow the underside of the chin and just below the wing with a dark mixture of red and green that makes a dark color.
- Paint the beak and eye with the same mixture. Use less water, so the color will be darker.
Leave the top-side of the beak unpainted and leave a white highlight in the eye.
 Leave the light green showing on the top.
- Before the beak dries, use a damp brush and pull diluted color to the top side of the beak where the light will be hitting.
- If the beak and eye dry too light, paint them again with more black.
- Darken the head and body by adding more green. Still use the tip of your brush to simulate the small feathers.
Using the White Paper
Leaving the white paper is another great watercolor technique for beginners.
- In the step above we painted around the white highlight in the eye.
- Leave a bit of white around the eye to differentiate it from the feathers.
- Many hummingbirds, also have a white patch behind the eye. So we paint around the white patch and leave the white paper untouched.
There are more ways to get white with watercolors.
Next: Wet into Wet
A great technique for beginners is painting wet into/on wet.

- First paint the tail with a pale green. Add more water to the yellow-green you used before.
- Wipe your brush and pickup a green with less water.
- Lightly run the brush along the top edge of the tail while the pale green is still wet.
The darker green will run into the wet pale green.
If you wish before the paint is not thoroughly dry, you may indicate a little dark between the feathers.
 Paint the gorget of the hummer.
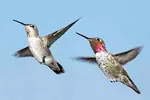
Now comes the fun part of painting a watercolor hummingbird. We get to paint where the Ruby-throat got its name. Check out the photographs of hummingbirds.
- Paint his gorget with red. Use lighter red up towards the light and darker red away from the light under his throat. Mix a darker red for under the throat, by adding a bit of its complimentary color - green.
- Put some green out on the tail feathers. Add some dark to differentiate between the tail feathers. Mix the darker green by adding red.
- Shadow the underside of his belly with a diluted beak color.
 Painting the wings of your hummingbird.
- Paint the wings with a diluted version of the beak color. You may put darker shadows between the feathers.
- An optional way is to paint the wing feathers all the same light color. When the color is almost dry, put some lines to indicate the separation of feathers.
- There is some green that goes from the body up into the base of the wing.
 Paint the hummer's underside with feet.
- Put some color onto the body, but leave a white space below the gorget.
- There is also a bit of white under the body just in front of the tail.
- He has a couple of little black feet tucked up under his body.
Paint them with the same dark mixture used on the beak. The complimentary colors, red and green make a nice neutral dark color.
There's more about mixing dark and neutral colors.
Paint the Flowers
Freely paint the flower petals with shades of red that match the ruby-throat of the bird. (Remove any masking before painting the flower.)
 Paint the flower with freedom.
- The petals will be lighter on their ends and darker where they attach. Leaving some sparks of white gives the flower life.
- The center petals of the flower are light yellow and the shadows are the same grey as the bird's wings.
- Put some green sepals under the flower to tie it together with the green on the hummingbird.
After the flower is totally dry, erase the pencil lines.
Can We Fix Watercolor Mistakes?
There are no mistakes that can't be fixed.
Sometimes the highlight on
the eye gets accidentally painted (like in the photo).
After the paint is dry, you can pick out the highlight with the point of a sharp knife.
We may want to adjust a painted area.
If we make a mistake, use a damp brush to put some water on the mistake.
Rub it a bit with a brush and blot the loose color off with a paper towel. Repeat as necessary.
That's where the green went up the wing too far. I removed it.
Watercolor Clean-up is Easy
Clean the palette with a spray of water in the mixing area. Wipe the loosened colors off with a paper towel.
Wash your brushes by swirling them in a container of clean water. Check to see if all the paint is gone by tapping them on a towel.
Round brushes: Swirl the clean brush in water again and then shake it to make the bristles form a point.
Flat brushes: Caress the bristles with a towel to pull them into a chiseled edge.
Lay the brushes horizontal to dry. Storing a wet brush upright will let stuff run down into the ferrule and eventually ruin the brush.
Clean the water container so you're ready for the next painting.
Painting a Wash
A wash is normally done wet on wet on a large area like the sky, a large lake, etc.
You would pre-wet the area and start with a dark color. Add water as you paint down the paper, so the color gets lighter and lighter.
It may be done in reverse. Start with a light color. As you paint add more paint to darken color or even change colors.
 Hooray! The painting is finished.
You may want to put a wash on the background. It's your choice.
I mixed a light neutral color with the red and green. Using a little more red than the beak mix made it a brown tone, instead of black.
Dampen the area around the bird and flower before applying your chosen background color.
Now It's Your Turn to Paint a Hummingbird!
We have finished painting a Ruby-throat Hummingbird with watercolor.
Any type of hummingbird can be painted in the same manner.
Next Step:
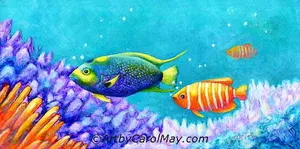
The next tutorial is a Koi Angelfish. It uses the same techniques you learned here, except the background wash is painted before the subject. That's easier; then we add to it to jazz it up.
Happy Painting!
There Is More to Paint.....
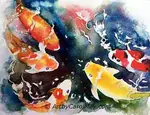
Koi Fish Painting: Pouring Watercolor is Fun!
Step into the vibrant world of Koi Fish Painting. Learn the enjoyable watercolor pouring technique and create enchanting koi art with this step-by-step tutorial
White Watercolor: How Do We Paint White in Watercolor?
How do we paint white watercolor? Popular techniques of how to do white in our watercolors. How do we keep the paper white? Is there white watercolor paint?
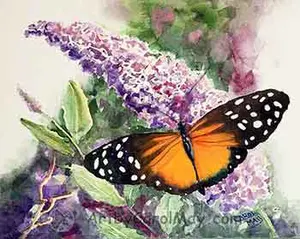
Watercolor Butterfly: Tutorial of a Realistic Butterfly
Learn how to paint a watercolor butterfly with this realistic step-by-step tutorial featuring a detailed butterfly perched on a butterfly bush flower.
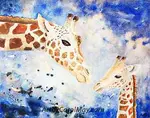
Paint a Giraffe -Paint 3 different giraffes, 3 different ways
Choose a style to paint a giraffe your way. Express yourself with traditional watercolor, an easy painting or a colorful painting, step-by-step instructions.
Recent Articles
-
Fix Common Mistakes
May 01, 26 01:00 PM
 Every artist encounters common painting mistakes. There are times when a painting just does not seem to work. Most often it's a design issue. The problems come back to composition, focal point, and va…
 -
Find Your Art Style
Apr 24, 26 01:00 PM
 Finding your style isn’t about picking a label or copying someone else. It’s about noticing what you’re drawn to - and repeating a few things long enough that your choices become consistent. Go from l…
 -
Create Your Own Art!
Apr 14, 26 01:16 PM
 If you have been following the step-by-step lessons and you are ready for the next step. Begin creating your own paintings with confidence. Learn how to plan a painting, solve common painting problems…