- Home
- How to Paint Watercolor
How to Paint Watercolor: It's Fun and Easy!
The basic techniques of how to paint watercolor in a step-by-step tutorial.
Walk through a complete painting of a beautiful Koi Angelfish together, as I share the essential techniques I use in my own work.
I’m artist and online painting teacher Carol May - you can read more about the artist Carol May before you begin if you’d like to know my story.
You'll be amazed at what you can create with just a few simple supplies and a little guidance.
 Watercolors are fun!
 Watercolors are fun!
How to Paint Watercolor
The essential knowledge to start painting watercolor.
If you’re completely new to painting, you may also want to visit my Beginner’s Path: Learn How to Paint page for an overview before doing this tutorial.
One Simple Rule You Need to Know for Watercolor
Most watercolor paints are transparent or semi-transparent. The light colors are not able to cover the dark colors. Even opaque colors, when they are mixed with water will not cover the dark colors sufficiently.
Paint watercolor from LIGHT to DARK.
Paint the light colors first. Then, as the painting progresses paint darker.
How to Paint Watercolor Step by Step
It's easy to paint watercolor step by step. We will be painting a colorful, freshwater Koi Angelfish.
Paint the tutorial by following the steps. Then you can confidently paint any subject with the same steps.
Let's get our materials together and paint this unusual Angelfish.
What Watercolor Supplies Do We Need?
Get together your drawing materials, masking fluid, a #7 round watercolor brush and the four paint colors below.
We will use 140# watercolor paper (any size), a palette or a Styrofoam plate, clean water and paper towels.

Have a container of clean water ready for painting and to rinse your brush between colors.
It's good to have paper towels or a sponge to wipe the excess water off your brush.
But I am trying a new thing instead, a wash cloth near the water container.

Using just a few colors creates a harmonious piece of artwork.
This scheme uses:
- yellow, orange and red-orange
- with their complements of blue-violet and blue.
What Are We Going to Paint?
It's a good idea to have reference material of whatever is our subject.


We will be painting the Koi Angelfish, a popular aquarium fish from the Amazon River of South America.
Draw Your Angelfish
Do your drawing on a separate tablet. Erasures on the watercolor paper can damage the paper.
Don't worry about doing a perfect drawing. Just have fun!
Transfer your drawing to your painting surface with graphite paper. If you are good at drawing, do your drawing directly on the watercolor paper.
 Mask the highlight and feelers.
Use light marks, when you put your drawing on the painting surface. Heavy pencil or graphite marks can show thru into the finished painting.
- Apply masking fluid to protect the highlight on the top of the angelfish and its two long feelers.
- Let the masking fluid dry before you do any painting.
Then you may paint right over the dry masking fluid and the paper stays white underneath.
Tips on Painting Watercolor
Keep a container of clean water. Wash you
brush between colors. Wipe the wet brush across a paper towel to remove
the excess water. Too much water makes wimpy, washed-out colors.
Always use a clean brush to dip into the fresh colors. Mix your colors out in the center of your palette away from the clean paint.
If you are going to paint a large area, wet the intended area. Paint clean water across the area. Keep the other areas of the painting dry, so the color will not flow into those areas.
Let the water soak into the paper until the shine is gone, but the paper is still damp to the touch. Paint the color across the intended area in one application.
Let the color dry before you paint color in the adjoining areas, so the colors don't bleed together.
Small areas may be painted without pre-wetting the paper.
Painting a Watercolor Wash: The Background
Remember watercolor is painted from light colors to darker colors.
Pre-wet the background area and let the excess water soak into the paper.
The background is painted in two layers: First a light wash and then after it is dry, darker colors are painted.
Background - Step One Paint a Wash
Paint the light areas.
 Start painting the background in the upper left corner.
The light in this painting is coming from the upper left.
Mix orange with plenty of water and start painting in the corner.
Paint quickly to prevent hard edges.
 Continue painting the watercolor wash down the paper.
It gets darker away from the light. So farther down, add a light blue.
Set the corner of your paper up on something to help the paint flow down while you paint. I used a piece of 2x4 wood.
Continue painting into the dark areas.
 Continue painting the first layer behind the fish.
- The background will continue to darken farther away from the light.
- Mix your orange or orange-red with blue or blue-violet to get darker colors.
- Paint around the angelfish including the top fin.
The first wash of the background is finished. Let it dry completely.
You may use a hairdryer to speed up the process. But let some water soak away first. Otherwise, the hairdryer will blow the colors around.
Note, the yellow on the fish is the masking fluid.
Background - Step Two
Now that the first layer is dry, add some darker colors behind and below the fish.
 Add some darker colors and texture.
It's time to have some fun, while painting dark colors over the first light colors.
- Dampen the area you are going to paint a little past where you want to paint.
- Paint your darker colors and stop before you get to the edge of the wet area. The edge will blend out softly, preventing any hard edges.
- While the paint is still wet, you may sprinkle on some sea salt for added texture.
- You may also, splatter some wet paint from your paint brush. Mix your desired color with water and load it onto the brush.
- Hold the brush over the painting. Then tap the handle of the brush to make the wet paint splatter onto the painting.
Let the background dry before you start painting the Koi Angelfish. This is how to paint watercolor, step by step.
Wet into Wet: The Angelfish
Now we get to paint the Koi Angelfish.
The angelfish aren't all marked alike. The bright color and where the dark spots are varied from fish to fish.
They all have somethings in common. The colored part is on the front and top of their body. It varies from yellow to orange.
The dark spots are black. They may appear anywhere on the body or fins.
The point is we don't have to be exact about where we put the color or the spots. Just paint and have fun!
That's what makes this a great subject for learning how to paint watercolor.
 Paint from the top of the Angelfish down.
Step One: Dampen the top area of the angelfish where you are going to paint color. Leave the eye dry because it's not painted at this time.
Paint the yellow heavier on the top edge of the fish. Paint lighter as you go down.
Where the yellow stops down on the body, feather the color out softly with a clean, damp brush for a soft edge.
 Paint orange while the yellow is still damp.
Continue painting your angelfish.
Step Two: While the yellow is still damp, paint wet into wet. Dab orange on the yellow, painting around the eye.
Softly dab the orange on with the tip of your brush to simulate the scales of a fish. The orange will feather out into the damp yellow paint.
Paint the Eye and Start the Dark Spots
Mix a black out of your complimentary colors, orange and blue.
 Paint the eye and shadow on the body.
Paint the black center of the eye. If you leave a little speck of white in the eye, it gives life to the fish.
Paint an orange ring around the eye with a lighter highlight.
Dampen the bottom part of the body.
Softly paint some lavender or blue shadows on the bottom half of the body. I painted the shadow splotchy to give an indication of scales.
Let everything dry.
Paint Wet on Dry: Detail and Finish
The colored parts, shadow areas and the fins of the angelfish are dry.
Now we can add more paint on top of the dry paint. That's how to paint watercolor in steps.
 Continue painting the black areas.
Continue painting the black areas of the Koi Angelfish.
Puts black spots on the body where ever you wish.
You may paint some black on the fins and pull out a few veins.
 Remove masking and expose the white paper.
Remove the masking fluid. Take the masking fluid off with a dry finger or a rubber cement pickup tool.
This exposes the highlight areas on the top of the body and the white feelers.
Paint the Feelers and Bottom Fin
After the masking has been removed:
- Soften the bottom edge of the body highlight with a damp brush.
- Pull some of the background color onto the feelers with a damp brush.
- Paint the one on the far side of the body slightly blue to make it look farther away.
 Finish the details of your painting.
The background color can be seen through the transparent fins and tail.
- Paint veins on the bottom fin and edge it softly.
- Put some water color on the dorsal (top) fin and the tail.
- Indicate the back edge of the tail with a dark color.
- Touch up anything you want.
Paintings don't have to be perfect. Just relax and enjoy painting watercolor!
What If the Paper Is Wavy?
Watercolor paper is normally stretched before using it. You wet the paper and tape the edges down on a board to hold it straight while it dries. Then when you put water and paint on it will not warp or buckle.
You may not want the hassle of stretching the paper. What are my suggestions? What did I do when I started painting watercolor?
While the painting is still a bit damp, but not soppy wet, place it between some clean pages of your watercolor tablet. Close the tablet and place a big heavy book on top.
Give it a day or two to dry and when you take the painting out it will be dry and nice and straight.
Easy-peasy, no stretching!
Let's Review - How to Paint Watercolor
As you've seen, painting watercolor is all about following a few simple steps, from layering light to dark to using techniques like washes and wet-on-dry.
You now have the knowledge to create your very own vibrant Angelfish painting. You can use the same techniques and paint any subject with confidence.
- Watercolor is painted light to dark.
- Watercolor washes are suitable for large areas.
- Painting wet on wet allows the colors to blend together with soft edges.
- Wet on dry creates hard edges that are useful in details.
The more we paint watercolor, the better we get and the more fun it is!
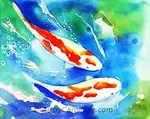
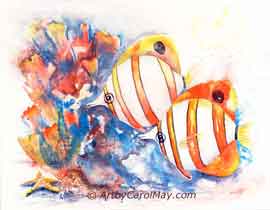
How Do We Paint White in Watercolor?
Many artists use the white of the watercolor paper, integrated into the painting.
The easiest way is to let the white paper show through. That's the beauty of painting watercolor.
The colors literally glow.
 Notice the Blue Arrow pointing to the light-colored coral.
There is no white paint on the coral. The white paper is showing through the paint.
This fish painting used several other white watercolor techniques.
See the more techniques of how to get whites in watercolor.
More Watercolor Tutorials
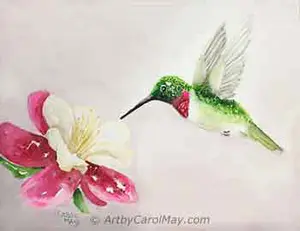
 Start with an easy watercolor tutorial.
This watercolor tutorial is great for beginning watercolor.
It just takes a few items to get started.
Prepare a container of clean water.
A plastic or Styrofoam plate will work for a palette.
Set out three colors; blue, yellow and orange (Burnt Sienna works well for this painting).
Paint the hummingbird and flowers with a #7 or #8 round brush.
Paint the hummer and the flower first and then paint the blue background with a larger flat brush, as desired.
Watercolor Glazing
Glazing is painting an additional color over a dry, previously painted color.
 Paint thin paint over dry paint.
Is glazing the same as layering?
It may be referred to as the same because a layer of watercolor is painted over a previous dry layer.
Is glazing the same as a wash?
Technically - Yes and No. Painting watercolor is often called laying down a wash.
So, when we glaze diluted watercolor over a dry layer - it could be called a wash.
Whatever it's called, glazing is an important technique for all watercolor artists.
More About How to Paint Watercolor
 Refine your watercolor techniques.
Review the basics of how to use watercolor, what supplies and colors are recommended for watercolor painting.
Draw and paint this feisty Rufous Hummingbird who doesn't mind sitting on such a thorny branch.
Start painting with the light colors.
Then when they are dry, glaze on the darker colors and shadows.
This painting uses only three colors, yellow, orange and blue.
Green is not included so you get to practice a bit of mixing colors.
Learn more about painting watercolor with this captivating tutorial.
Wrapping It Up
Now you have an idea how to paint watercolor. Watercolor is amazing!
With a couple of brushes, a few colors and ideas of what to paint, you are prepared for an exciting adventure.
Many successful painting to you!
If you’d like to know more about artist and online teacher Carol May, you can visit my about artist Carol May page to read my story and how I started painting watercolor.
More Pages to Enjoy
Watercolor Art Supplies on Art by Carol May
These watercolor art supplies are tried and true. What works for me will work for you; best paint, what to paint on, brushes, palette, can you paint on canvas?
Watercolor for Beginners: Paint Your Dreams
Watercolor for beginners: transform your dreams into reality with our comprehensive resource to empower you as you enter the captivating world of watercolor.
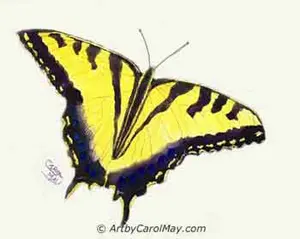
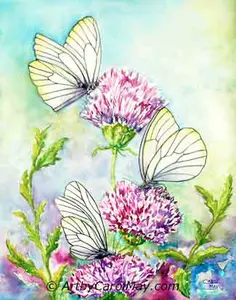
Paint a Butterfly: 5 Easy Steps + Watercolor & Oil Tutorials
Learn how to paint a butterfly in 5 easy steps, then choose a watercolor or oil butterfly tutorial that fits your style and skill level to paint with the steps.
Glazing with Watercolor for Beautiful Effects
Glazing with watercolor is the key to rich, luminous paintings. Learn how to layer transparent colors effectively with our comprehensive guide and expert tips.
Recent Articles
-
Fix Common Mistakes
May 01, 26 01:00 PM
 Every artist encounters common painting mistakes. There are times when a painting just does not seem to work. Most often it's a design issue. The problems come back to composition, focal point, and va…
 -
Find Your Art Style
Apr 24, 26 01:00 PM
 Finding your style isn’t about picking a label or copying someone else. It’s about noticing what you’re drawn to - and repeating a few things long enough that your choices become consistent. Go from l…
 -
Create Your Own Art!
Apr 14, 26 01:16 PM
 If you have been following the step-by-step lessons and you are ready for the next step. Begin creating your own paintings with confidence. Learn how to plan a painting, solve common painting problems…