- Home
- Koi Painting
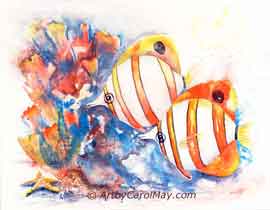
Do You Want to Do a Koi Fish Painting with Pouring Watercolor?
A koi fish painting is lots of fun, especially pouring the watercolor background!
There are different ways to paint with watercolors. I want to share with you a watercolor technique that is thoroughly enjoyable - pouring the watercolor.
It is unpredictable and that is what makes it so much fun.
Follow this step-by-step tutorial and paint five colorful, watercolor koi fish with an exciting background.
 Learning to pour watercolors.
 Learning to pour watercolors.
Koi Fish Painting
The challenge of learning how to paint watercolor is controlling the water and paint.
Challenges are fun that is what makes this painting watercolor koi so enjoyable.
Materials
This painting is on an 11x14 Aquabord. The aquabord does not bend. That makes it easy to pick it up and tilt it to move the poured paints where you want them.
- Transfer your drawing to the painting surface with graphite paper.
- Mask the highlight areas on the water with masking fluid. Let the masking fluid (also called frisket) dry completely before proceeding.
This watercolor koi fish painting is done with tube watercolors.
- New Gamboge Yellow
- Quinacridone Red / Winsor Red
- Prussian Blue
Painting the Koi
Start the painting with yellow koi who is the focal point of the painting.
 Start painting the focal fish.
We bring attention to a focal point by using warm verses cool colors.
We also use contrasting values.
He is painted with New Gamboge. Add a bit of blue to grey down his fins.
The eyes and mouth are a combination of red and blue that makes a black.
Next is the side-kick of the yellow koi fish. This koi is a bit smaller, so it will look deeper in the water.
 The colors flow to make orange.
Paint yellow on what will be the orange parts of the koi fish.
While it was still wet, drop in some Quinacridone Red. They mingled together to create orange.
Lightly use some yellow to indicate warmth on the white areas of the fish.
That's the beauty of painting koi fish with watercolor. The watercolors flow together so beautifully.
Next is the body guard for the yellow koi fish. He looks tough, don't you think?
 Paint the red and black / leave the white dry.
Wet the colored areas of the fish with clear water and leave the white areas dry.
Paint
the red areas with Winsor Red. Quinacridone Red didn't give a very
bright red. Use whatever red you prefer. The cadmium reds or their
replacement (Winsor Red) give the most saturated red colors.
While the red was still wet, add some black spots. The colors softly mingle together. (Mix the red and blue for the black.)
Oh, the beauty of painting watercolor!
We can practice pouring watercolor with this koi fish. (How to pour is in the next section.)
 Experiment with the top fish.
Pour yellow on one side.
Then pour red on the opposite side of the fish. Let the two colors to mingle together.
They mingled, but they ran outside of the area of the fish because the mix had too much water.
The dark background will cover the runs outside of the fish's body.
That's part of the challenge of pouring with watercolor.
Next - the Background
The major painting is done on the koi fish. Let them dry.
 Ready to do the background
We will detail the koi more after the background is finished.
When the background is done, we will be better able to see the colors and values. Then we can use them to our advantage.
Pouring Watercolor for the Background
Pouring is a fun part of these watercolor koi.
 Mix the paints in cups with water.
Using tube watercolors, put about a quarter inch of each color into separate containers. The small cups used for dipping crab in butter work great.
Add about a tablespoon of water.
Stir thoroughly to dissolve all the paint.
Start Pouring the Watercolors
- Be sure the fish are dry!
- Keep the painting support level. We are better able to control the colors and keep them out of the koi on a level surface.
I started with the blue in the upper right. Then I put some red on the left. The top edges of the blue and red were spritzed to make them softly move out into the white.
Keep pouring the three colors around the koi. Use your artistic license and choose what looks good to your preferences.
 Start pouring paint around the fish.
The unpredictable movement of the colors is a joy of pouring watercolors!
Let the Paint Dry
When you are satisfied with the results, let the koi fish painting dry overnight.
The colors between the lower left koi look brown. Oh-oh, I realize what I did. I broke one of my own rules.
I mixed Winsor Red. It is not a transparent color. It doesn't mix well with other colors. So, I got brown instead of a purple. But actually, it makes a warm background for the warm fish.
The background around the yellow focal fish is cool. The contrast brings attention to the focal koi.
 The pouring is finished. Let it dry.
Detailing the Watercolor Koi Fish
Look over each koi. Make any necessary adjustments that catch our eye.

Use a damp brush to soften the edges of the koi, except the focal fish.

Leave the hard edges on the focal koi to make him stand out.

Apply a thin wash of blue on the edge each koi to set them into the water.

If the poured watercolor went over the fins, clean them with a stiff damp brush.
Make sure the painting is dry, then remove the masking.
When I was first learning how to paint watercolors, I made the mistake of removing masking from damp paint.
What a mess! The masking picked up paint. I got paint on my fingers and touched it into areas where it didn't belong. A lesson well learned.
The Final Touches
- Make any corrections that catch our eye.
- Where the masking was removed from the water swirls, soften them with a damp brush.
- Shadow the swirls to give them form.
The top left fish was competing with the focal fish. The contrast with his background was lessened, so he didn't draw so much attention.
The dark on the right of its body was removed by spritzing water on the color and blotting it up with a paper towel. Red was poured to replace the dark color.

Painting Koi Fish is Fun - Enjoy!
More Pages for Your Pleasure
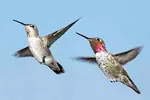
Types of Hummingbirds in the United States
Identify 15 types of hummingbirds that visit the United States with photos, information and identification tips, Ruby throated Hummingbird, Black chinned, Annas
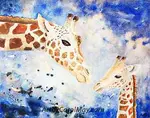
Paint a Giraffe -Paint 3 different giraffes, 3 different ways
Choose a style to paint a giraffe your way. Express yourself with traditional watercolor, an easy painting or a colorful painting, step-by-step instructions.
White Watercolor: How Do We Paint White in Watercolor?
How do we paint white watercolor? Popular techniques of how to do white in our watercolors. How do we keep the paper white? Is there white watercolor paint?
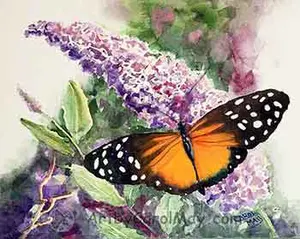
Watercolor Butterfly: Tutorial of a Realistic Butterfly
Learn how to paint a watercolor butterfly with this realistic step-by-step tutorial featuring a detailed butterfly perched on a butterfly bush flower.

Recent Articles
-
Find Your Art Style
Apr 24, 26 01:00 PM
 Finding your style isn’t about picking a label or copying someone else. It’s about noticing what you’re drawn to - and repeating a few things long enough that your choices become consistent. Go from l…
 -
Create Your Own Art!
Apr 14, 26 01:16 PM
 If you have been following the step-by-step lessons and you are ready for the next step. Begin creating your own paintings with confidence. Learn how to plan a painting, solve common painting problems…
 -
Improve Your Art!
Mar 20, 26 12:00 PM
 Painting daily will put your art into overdrive! There is a current craze among the art community to complete a small painting every day. Regular painting is the best way to learn how to paint! You do…